Page 2 of 6
Re: Engine project
Posted: Wed Mar 23, 2016 9:40 am
by mellorp
bozbridge wrote:I would've booked on at Donny already but I'm at the TT, only getting back on the Wednesday and sadly back at work on the 16th. I'll be at the Cadwell PSB weekend again to give it it's first bit of track time.
Nice work Dougie. Shame about Donington Park but enjoy the TT - See you at Cadwell

Re: Engine project
Posted: Wed Mar 23, 2016 10:17 am
by Luders
When is the Cadwell one?
Re: Engine project
Posted: Wed Mar 23, 2016 4:55 pm
by DougB
Cadwell is July 9-10th, still places left both days I think.
Re: Engine project
Posted: Thu Mar 24, 2016 8:50 am
by Luders
I am running a race meeting at Croft on those dates
Re: Engine project
Posted: Thu Mar 24, 2016 11:21 am
by 500bernie
Hi Ben,
Did you not get enough of the ultimate in track surface finishes when you last visited?
There are bound to be more weeds on the track now, since all the rain we have had

Cheers,
Bernie
Re: Engine project
Posted: Thu Mar 24, 2016 12:42 pm
by Luders
Certain areas were resurfaced in 2014 and there are new shower facilities.
I'm also not racing, I am the event organiser hiring the circuit.
Re: Engine project
Posted: Tue Mar 29, 2016 9:32 pm
by DougB
Shame you can't make it to Cadwell Ben but at this rate neither will this motor! Top end is giving me a string of headaches. First one, the F3 valves I got, I knew they needed some modifying but just when I think I get one thing sorted another pops up:
The 2 valves I got
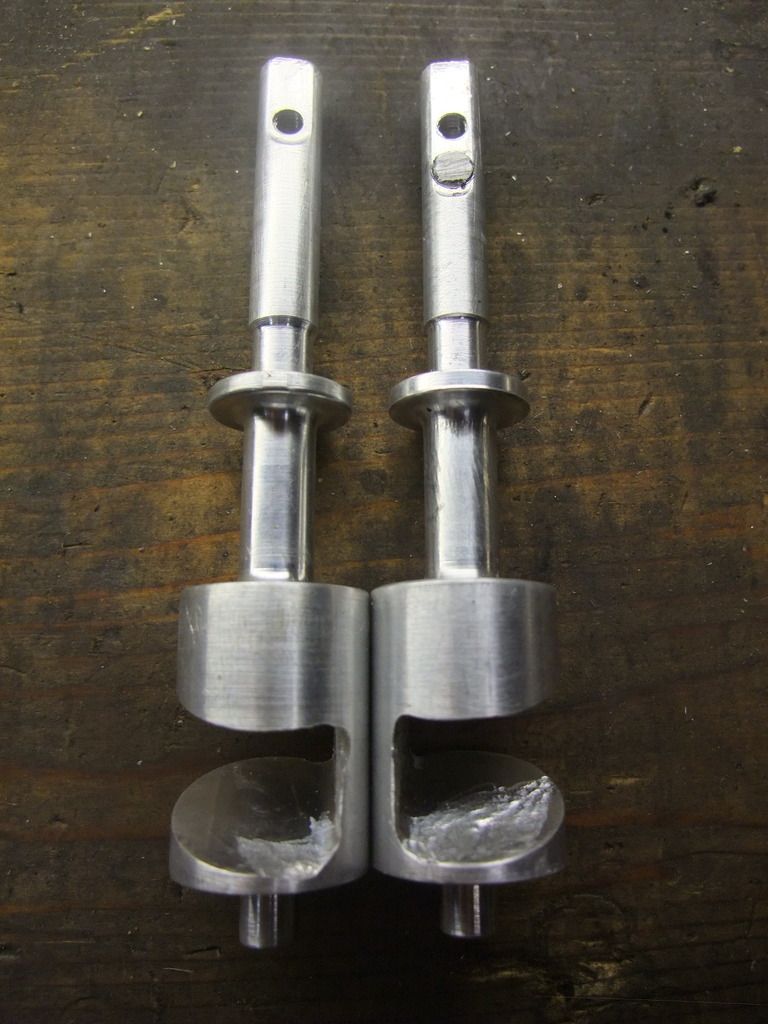
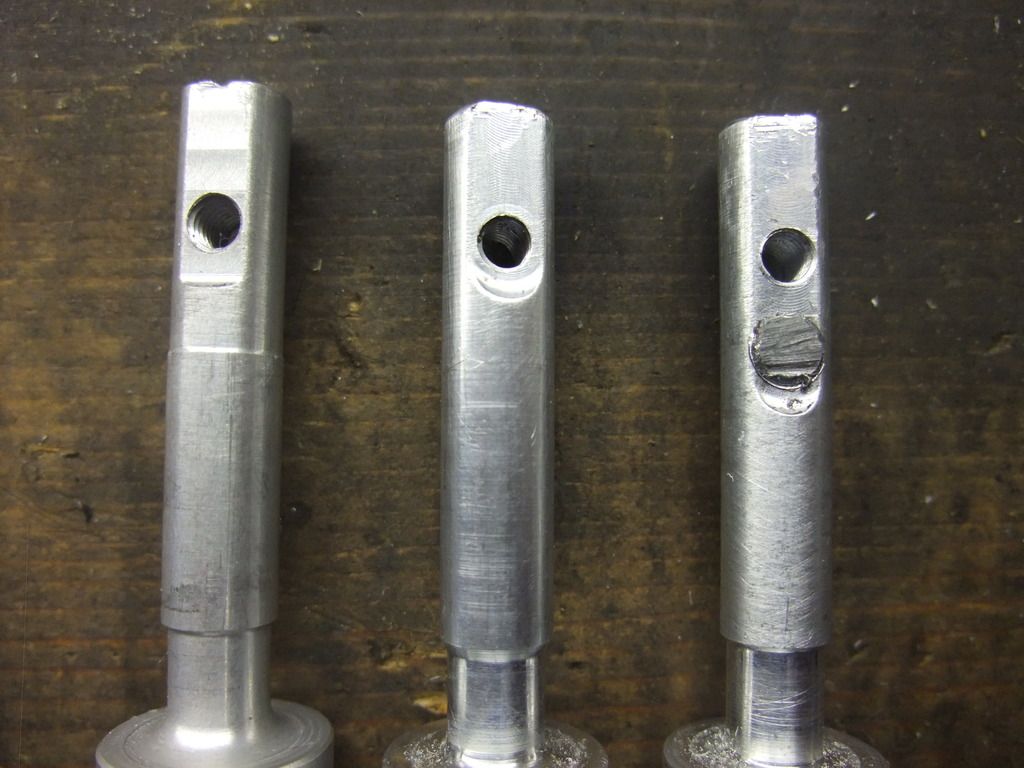
The right one needed a new hole drilling & threading, and the oversized hole that was too low filling. When that was done I though I was sorted, ohhhhh no no no, the diameter of the valve on the left in that last pic is too big at the top. Next pic is a brand new BDK standard kips valve on the left to show the difference, the valve should be narrower at the top so the valve in the middle of the pic needs machining down to match. Strangely, the valve that needed re-drilling (on the right) is too narrow the WHOLE way down so the pulley wheel fits but it's slack in the seal. I could fix all this by just buying a pair of BDK F3 valves, but I have access to a lathe so am determined to fix it!
Re: Engine project
Posted: Tue Mar 29, 2016 9:41 pm
by DougB
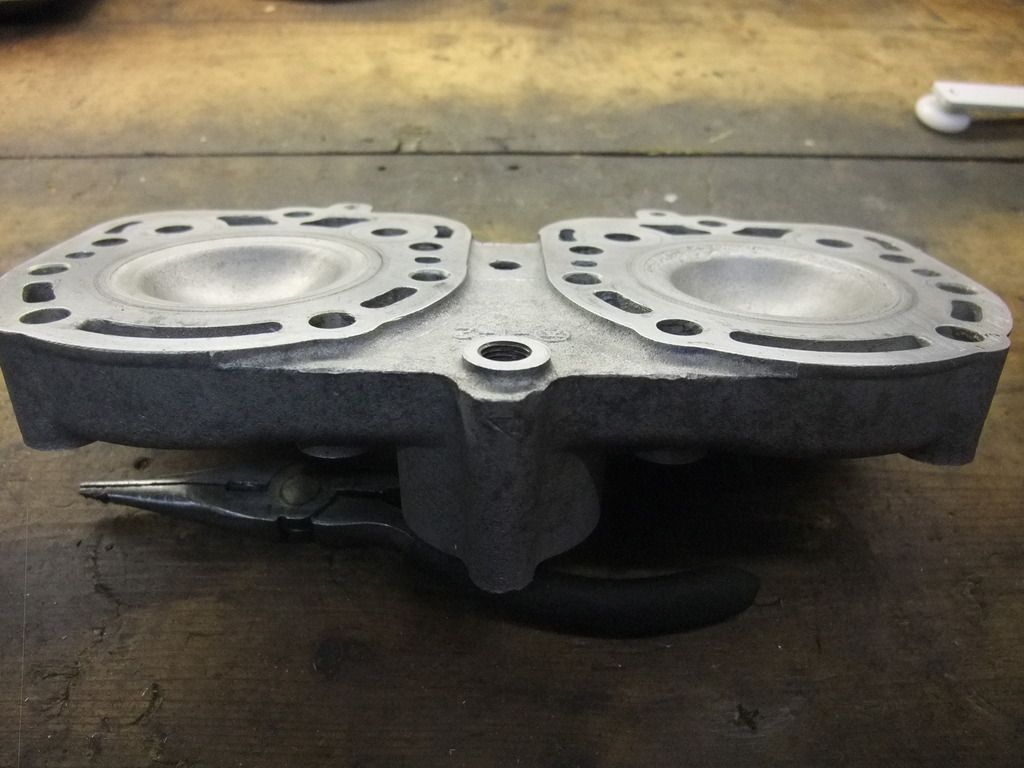
Next the cylinder head. I figured to set the squish I'd bolt the whole thing down minus base, head gasket and piston rings and check the gap the usual way, then add gaskets to get the squish spot on. I expected this to take a couple of goes. Again, not a chance.
The pistons hit the head. So, I tried again with .8 base gaskets in, I got clearance but so little I couldn't use solder as it wouldn't crush enough (using 1mm solder, and it crushed down to .3mm) so still wasn't sure of the gap. So I stuck a head gasket in as well and got a squish measurement of 0.4 - 0.5 mm. I guess the head has been skimmed by too much to be useable.
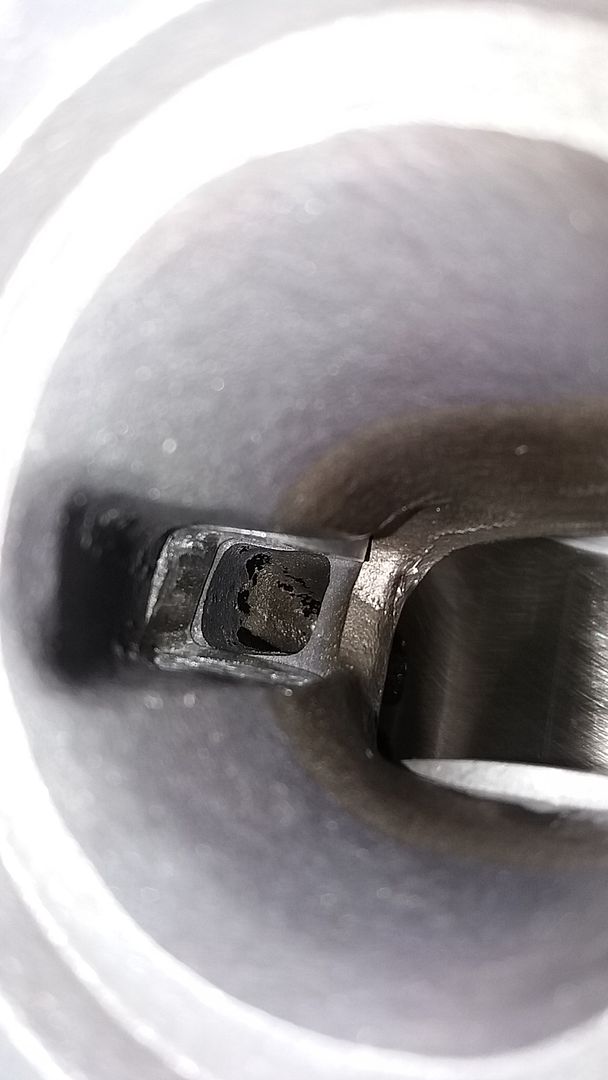
It's obviously been run as the right chamber has been detonating before
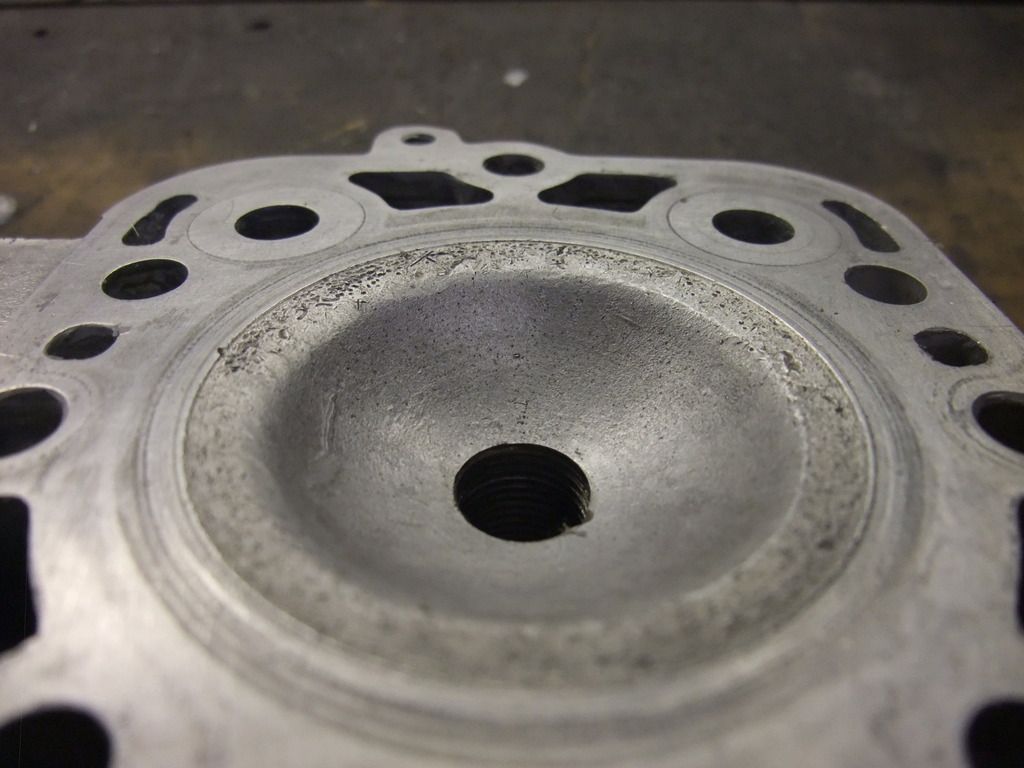
I have a brand new head still in its packet, but I don't want to use it as to get what I want I'd have to skim it. So I'm going to a friends workshop in a couple of days and we're going to try and mill out new squish bands then adjust the volume of the chambers to see if we can make this head useable, even if we screw it up it's scrap to me anyway so nothing lost. Have to see how our machining skills are
Re: Engine project
Posted: Tue Mar 29, 2016 10:37 pm
by JanBros
what I did when milling new chambers :
1/ bolt the head on the mill with the chambers at the bottom, and skimm all bolt surfaces on top to the exact same height
2/ make a "jig" on which you can bolt the head upside down : basicly a solid plate on which I welded 10 high supports through which you can bolt the head on the jig. skimm all 10 of them to the exact same height.
3/ I also welded 2 nuts on the jig to bolt the head on the jig through the spark plug holes.
4/ bolt the head with the plug holes and skimm the entire head so it's flat and even
5/ mill new chambers
Re: Engine project
Posted: Tue Mar 29, 2016 10:39 pm
by JanBros
what I did when milling new chambers :
1/ bolt the head on the mill with the chambers at the bottom (just tight enough so it won't move) , and skimm very gently all bolt surfaces on top to the exact same height. if the head is warped and bolted firmly, your skimmed bolt surfaces may not be equal in height.
2/ make a "jig" on which you can bolt the head upside down : basicly a solid plate on which I welded 10 high supports through which you can bolt the head on the jig. skimm all 10 of them to the exact same height.
3/ I also welded 2 nuts on the jig to bolt the head on the jig through the spark plug holes.
4/ bolt the head with the plug holes and skimm the entire head so it's flat and even
5/ mill new chambers
Re: Engine project
Posted: Wed Mar 30, 2016 7:12 am
by DougB
Thanks, I was thinking along similar lines so hopefully I'm on the right track then.. Machinery we're using is practically new so we'll have that to get used to as well but should go ok.
Re: Engine project
Posted: Wed Mar 30, 2016 12:25 pm
by maccas
Regarding machining the head, personally I'd do that last!
I'd get the cylinders where I want them relative to the piston, then work on the head.
Raising or lowering the cylinder by 0.5mm can have a huge effect on performance! So get your ports where you want them first

Dan
Re: Engine project
Posted: Wed Mar 30, 2016 2:52 pm
by DougB
No problem Dan I've sorted that now, tried messing with the different base gaskets I've got from you over the last year or so and settled with the port height where I want it so I'm working from there now. Already know how much I want off the chambers I'm just not sure yet how it'll go but what the hell if I wreck the head I've got a new one to start on!
Re: Engine project
Posted: Thu Mar 31, 2016 10:13 pm
by DougB
So far so good, have to see how it all goes back together now..
Re: Engine project
Posted: Fri Apr 01, 2016 4:34 pm
by DougB
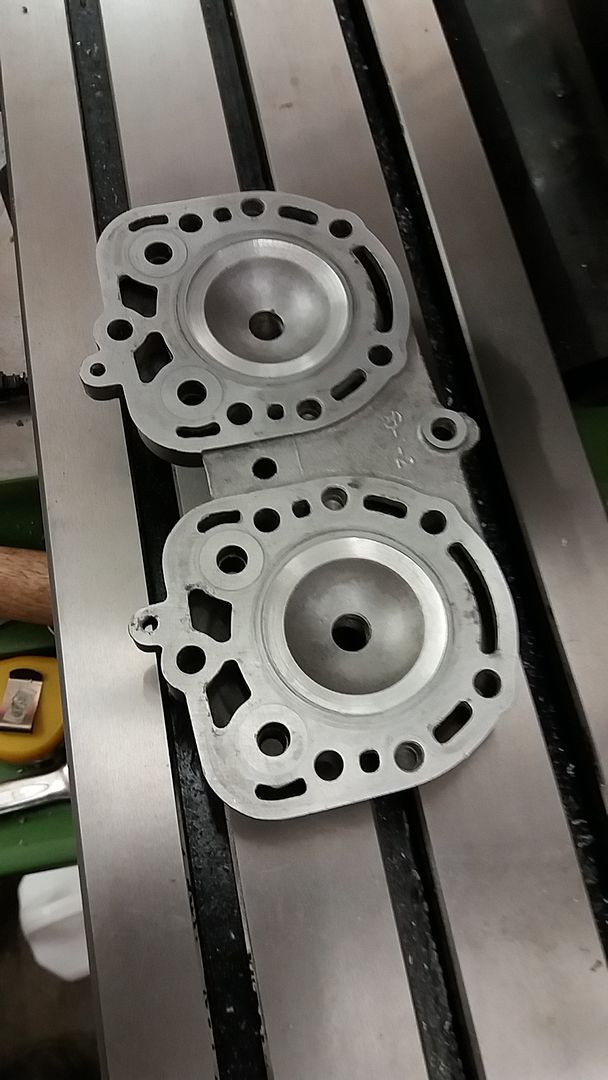
Finally, it's back together and all timed up and squished up. Squish is a nice even .7mm, I've machine the squish to be tightest at the cylinder wall so it increases to about .76. I won't bore everyone with my calculations but compression ratio should be 13.2:1 Timing seems to be working out at main exhaust 189,transfers 128 and Kips 196. I was using a magnetic inclinometer for the first time and the figures might be a bit out as it was trickier to set up than I was hoping but it's close enough for me.
Used new BDK pulleys and arms so the valves are as good as I can get them, just about time to get it on the bike now and get it run in


Hoping these valves are worth the effort, bloody things have been a headache!